
A couple of weeks ago I wrote a blog on how to add subtitles to videos you post on Facebook. We received a lot of positive comments about it, so I’ve decided to continue this series. The next blog in this series will explore how to add subtitles to videos on YouTube.
Adding subtitles to your YouTube videos makes them more accessible to anyone viewing them on YouTube but also when you share a YouTube video on your other social media channels.
YouTube offers a number of different ways to add subtitles to your videos via YouTube Studio.
- Create subtitles or closed captions – This process involves creating subtitles from scratch and adding them manually.
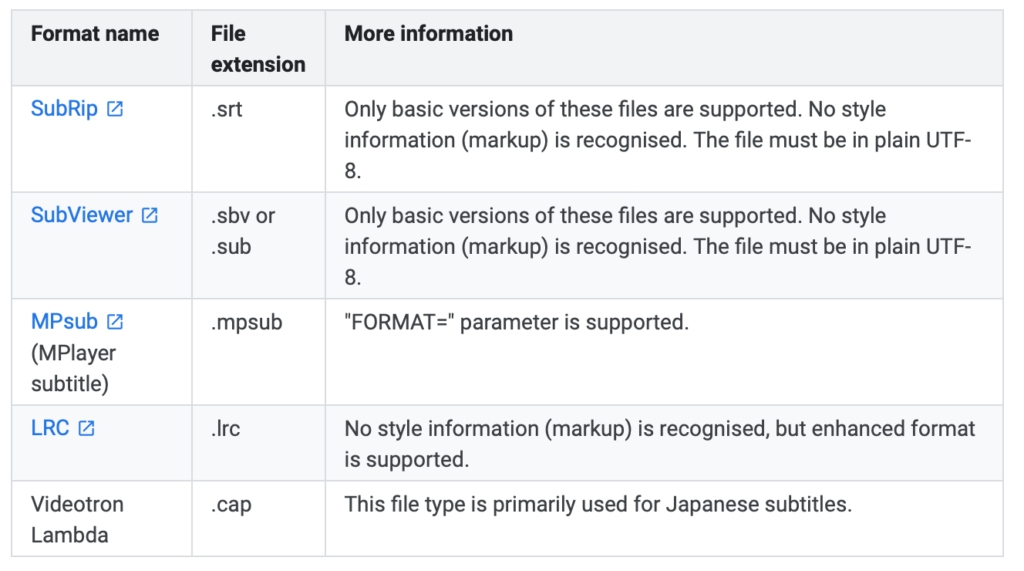
- Upload a file – You can upload a file in a certain format. In our previous Facebook and LinkedIn blog posts we have referred to this as a .srt document. You can learn how to create an .srt document in this article. All of the supported files on YouTube are listed below.
- Transcribe and auto sync (original video language only) – We use this option for all of our videos we create. Because we tend to plan our videos and have a script, it’s easy to use this option to create subtitles as we already have the text written out. For the purposes of this post, we will be showing you how to do this.
- Automatic Captioning – YouTube uses voice recognition technology to create captions for your videos which are automatically published on your videos. The only downside to this is it can struggle with accents or any words which may not be clear. If you are adding your own subtitles, I would recommend deleting the automated ones. If you are happy to use the automated ones, then make sure you take the time to check them as you may don’t want any embarrassing slip ups in your subtitles.
How to use the Transcribe and auto-sync option
You can add subtitles to a new video you have just uploaded or to an existing video that you previously uploaded. The process is the same for both.
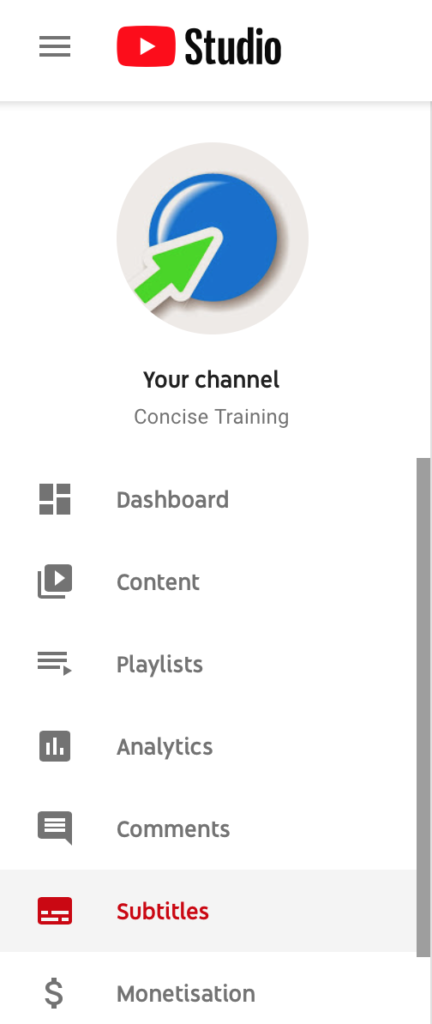
- Log in to your YouTube account and go to YouTube studio.
- On the right-hand side, you should see a menu. (If this doesn’t appear click the 3 lines (hamburger menu) icon to expand the menu)
- Click on Subtitles in the right-hand menu
- You will see a list of your uploaded videos in chronological order
- Locate the video you wish to add subtitles to (If it is the most recent one you uploaded then it will be the first video you see at the top of the page) and click on the title
- You will see that there are already some subtitles listed. These are the ones automatically created by YouTube using voice recognition when you uploaded the video.
- To the right you will see a blue Add icon.

- Click this button and it will open up the page where you can manage your subtitles

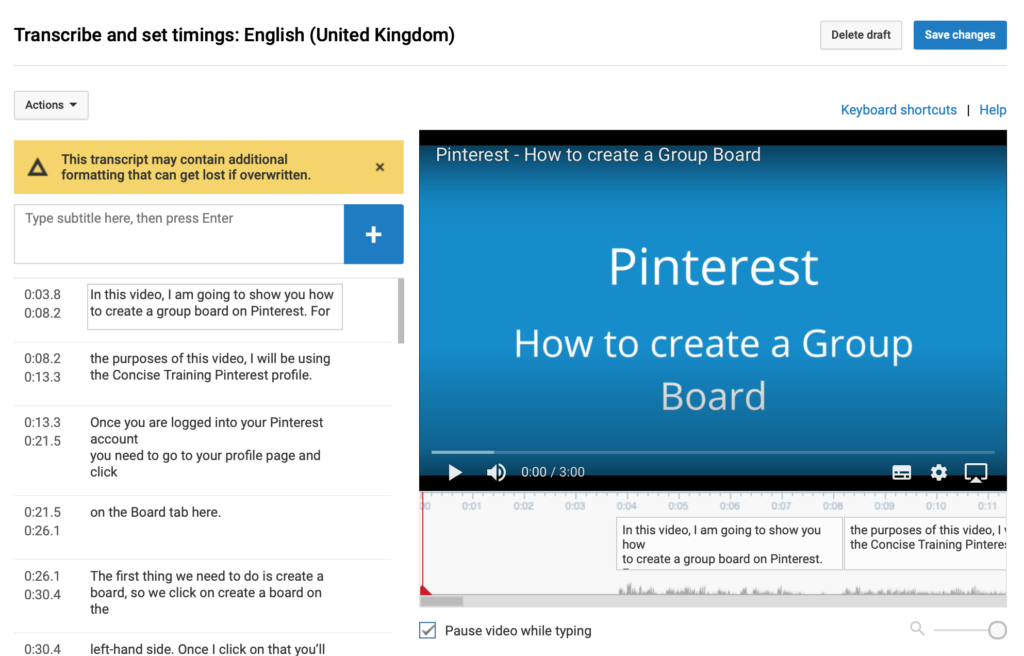
- Click on Transcribe and auto-sync. This will open up the box so you can add your subtitles.

- If you have your text in a Word document, you simply copy and paste the text into the box that says, “Type what’s spoken here”.

- Once you have copied the text into the box, you click the blue Set timings button. YouTube will now match your typed text to the spoken word text in the video. This process can take a few minutes depending on the length of your video.
- Once you have given YouTube the chance to set the timings, go back to the YouTube Studio, click on Subtitles in the right-hand menu and locate the video you have just added the subtitles to. You will now see 2 subtitles appear. In the example below the top subtitles are the automatically created ones and the next one is the ones I have created. The ones created by YouTube have Automatic in brackets and the ones I created have Published by Creator in the Title and description column. This shows that your subtitles have been added. I would always recommend deleting the Automatic subtitles once your new ones have been published.

- To delete the automatic subtitles hover over the Published Automatic text in the Subtitles column and click on the 3 dots which appear and click Delete from the drop down options that appear.

- I would always recommend that you check your video with the subtitles turned on to make sure they have synced correctly.
Need to amend your subtitles?
If you need to make any amendments, you can easily do this by hovering over the Published text in the Subtitles column and clicking on the 3 dots that appear and clicking on the Edit on Classic Studio option.

You will then see all the subtitles appear in timed format. You click the Edit option in the top right above the video preview and you can make any text amendments that you require.

Once you have finished editing you can click Save Changes in the top right.
Will you be adding subtitles to your YouTube videos? Do let us know how you get on in the comments below.